2026-10-26T03:41:28.103Z ·
Hail Damage Roof Documentation: What to Photograph in the First 48 Hours
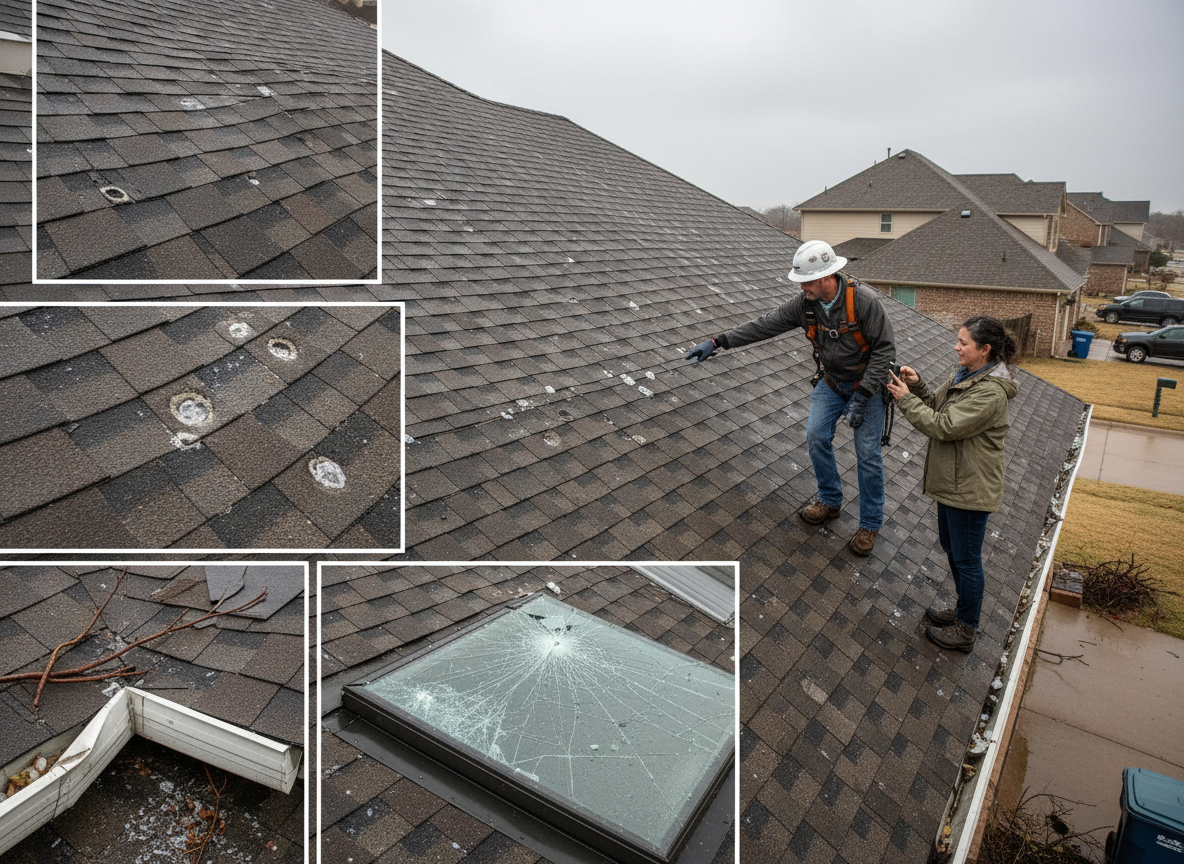
Hail is the most common cause of roof damage in the United States, and the hardest to prove after the fact. The stones are gone within minutes, the evidence washes away with the next rain, and the marks that remain look a great deal like ordinary wear to anyone who is not looking for them. The first two days are the window in which a homeowner can capture what actually happened, and almost everything that follows — a repair decision, an insurance conversation, a survey at sale — rests on that record.
The First Two Hours: Do Not Go Up
The single most useful thing you can do in the first hours is stay off the roof. A hail event is usually followed by wet surfaces, loose debris and, frequently, more weather. Roofs cause a significant share of domestic fall injuries, and a photograph taken from the ground is worth more than a photograph taken from a hospital.
What you can do from the ground is record what the storm left at eye level. Photograph the ground below the downpipes, because that is where granules shed from a damaged shingle collect. Photograph the gutters, the downspout mouths and any metal garden furniture, because denting on soft metals is one of the clearest records of stone size.
Then photograph anything inside that has changed: a new stain on a ceiling, damp at a wall, water on a floor. Take a wide shot that shows where in the room it is, and a close shot that shows the extent.
What to Photograph on the Roof
When it is safe and dry — usually the next day — the roof itself needs a specific set of images rather than a general sweep.
Each elevation, from the ground or from a window. Wide shots establish the roof's overall condition and let a later comparison show which slopes were affected.
The ridges and hips. These take the highest wind load and the most direct hail, and lifted or creased ridge caps are among the most common findings after a storm.
The valleys. Valleys carry the most water on a roof and are where impact damage is easiest to miss. Granule loss at a valley is a strong signal.
Every penetration. Vent pipes, flues, exhaust fans, skylights and satellite mounts sit in the places where a covering is interrupted. A cracked boot or a dented flange is small, specific, and easy to photograph.
The soft metals. Gutters, downspouts, valley metal, vent hoods, flashing caps and the top of any outdoor air-conditioning unit. Hail dents these, and denting is evidence that stones of a certain size were present.
Close-ups with scale. A coin, a ruler or a tape measure held against an impact mark gives the photograph a scale. Without one, a mark could be anything.
Use the highest resolution the phone offers, keep the location tagging off if you would rather not publish where you live, and do not edit or crop the originals. Duplicates are fine; originals are the record.
What to Write Down
Photographs need a companion text file, even if it is a note on a phone.
Record the date and the approximate time of the storm. The direction the wind was coming from, if you noticed. The duration of the hail and the largest stone size you saw, described relative to something familiar. Whether the hail was accompanied by wind, rain or both. Whether trees, screens, vehicles or garden furniture were damaged, since damage to other objects corroborates the roof.
Then describe the roof: the covering type if you know it, roughly when it was last replaced, whether it has been repaired before, and any leak or stain that existed before the storm. That last point matters more than any other. A record that distinguishes old damage from new is far stronger than one that implies everything happened at once.
Finally, note who you spoke to and when: the insurer, an agent, a roofer. A simple timeline is enough.
The Interior Evidence
Water that enters a roof does not necessarily show up where it entered, and interior evidence often identifies a problem before anything is visible from outside.
Look at ceilings, particularly near exterior walls, chimneys and valleys. Look at the attic if it is accessible: staining on the underside of the deck, damp insulation, and daylight visible through the sheathing are all significant. Photograph anything you find, and note which direction it appears to be running.
If water is anywhere near a light fitting, a switch or a consumer unit, stop using that circuit and keep away from it. Do not stand under a ceiling that is bulging, and do not push at it.
What Not to Do
Do not climb onto the roof in the rain, in wind, or in the dark. Do not move or remove damaged material before it has been photographed. Do not apply sealant to a detail that an assessment will need to see, because it hides the evidence and rarely stops the water. Do not throw away the damaged components that are later removed: an assessor may want to see them.
Do not assume that a roof which is not leaking is a roof which was not damaged. Hail bruises the reinforcing mat beneath the granules, and a bruised shingle can stay watertight for a season while its remaining life has dropped sharply. The absence of a leak is not the absence of damage.
And do not sign anything on the day of the storm. An authorisation signed at the door is not an assessment, and the person asking for it has not yet been on the roof.
The First 48 Hours in Order
Hour 0–2: stay off the roof, photograph what you can see from the ground and inside, note the time the storm passed.
Hour 2–12: check gutters and downpipes for granule accumulation, photograph soft metals, move valuables away from any drip, and isolate any circuit near water.
Day 1: in daylight and only if it is safe, photograph each elevation, ridge, valley and penetration. Note anything that has changed since the storm.
Day 1–2: write the timeline, gather any pre-storm photographs you have of the roof, and contact your insurer if you intend to claim. Ask what they need and in what form.
Day 2: arrange an assessment. Ask for dated photographs of what is found, a written description that separates storm damage from wear, and a scope that lists materials and labour separately.
Why the Record Matters Later
Insurance policies generally cover sudden damage from a storm and exclude wear and tear, and the difference between the two is established by evidence rather than by assertion. A claim made a week after the event with dated photographs is a different conversation from one made a season later with a description.
The same record matters in other contexts. A buyer's survey will ask about the roof's history; a future repair will need to know what was replaced and when; and a second storm will raise the question of which event caused which damage, which only a dated record can answer.
When to Call a Roofer Rather Than an Insurer First
An assessment first is usually the better order, provided it is documented. A roofer who has inspected the roof can tell you whether there is damage to report, where it is concentrated, and what the repair would involve. That makes the insurance conversation specific rather than speculative.
What an assessment should not be is a sales visit dressed as an inspection. Ask for photographs of what was found, including the areas that were sound, and for a written description rather than a verbal verdict. If the roof needs a repair, the scope should list materials and labour as separate lines so it can be compared with another.
The Short Version
Stay off the roof. Photograph from the ground and from windows. Photograph the soft metals, the ridges, the valleys and every penetration. Note the date, the wind direction and anything that was already damaged. Look for interior evidence and photograph that too. Record who you spoke to and when. Then have the roof assessed and keep the report.
If the roof is leaking now, call (833) 406-0167 and describe what you are seeing. If it is not, the record you build in the next two days is the thing that will matter when it does.